Building Instagram-Like Image Filters with JavaScript
2015-07-11A hands-on journey implementing Instagram-style image filters using JavaScript's Canvas API, covering pixel manipulation techniques, tone curve adjustments with Lagrange interpolation, and performance optimization with Web Workers.
I recently wanted to practice working with the Canvas API, so I started playing around with image manipulation. That’s when I thought—why not try implementing Instagram-like image filters? It sounded like an interesting challenge, so I gave it a shot. However, the journey wasn’t exactly straightforward, so I decided to document my approach, including the detours and lessons learned along the way.
To be clear, the filters I implemented aren’t perfect replicas of Instagram’s effects. Some still need refinement, and others might not be very practical. That said, if you have suggestions on how to improve them—such as better techniques, APIs, or alternative approaches—I'd love to hear them! :grin:
Extracting Image Pixels with the Canvas API
While exploring the Canvas API, I discovered that it allows us to extract pixel data in RGB format. This is done using getContext('2d') and getImageData(), which provide access to raw pixel values.
Filter.canvas.getPixels = function(img) {
  var canvas = Filter.canvas.getCanvas(img.width, img.height);
  var context = canvas.getContext('2d');
  context.drawImage(img, 0, 0);
  return context.getImageData(0, 0, canvas.width, canvas.height);
};
Early Experiments: Sepia, Grayscale, and Mirroring
The returned pixel data consists of an array where each pixel is represented by four consecutive values—Red, Green, Blue, and Alpha (transparency):
var pixels = [
  15, 16, 28, 255, // Pixel 1 (R, G, B, A)
  22, 51, 59, 255, // Pixel 2 (R, G, B, A)
  33, 55, 59, 255, // Pixel 3 (R, G, B, A)
  ...
];
By modifying these values, we can apply effects like grayscale conversion, sepia tones, or horizontal mirroring. (Of course, for real-world applications, CSS filter is often more efficient, but this demonstrates that similar transformations can be done with Canvas.)
Example 1: Grayscale
// grayscale
Filter.grayscale = function(pix){
  for (var i = 0, n = pix.length; i < n; i += 4){
    // calculated from NTSC
    var grayscale = pix[i] * .29 + pix[i+1] * .58 + pix[i+2] * .11;
    pix[i]    = grayscale;
    pix[i+1]  = grayscale;
    pix[i+2]  = grayscale;
  };
};
Example 2: Sepia
Filter.sepia = function(pix){
  for (var i = 0, n = pix.length; i < n; i += 4){
    pix[i]    = pix[i]    * 1.07;
    pix[i+1]  = pix[i+1]  * .74;
    pix[i+2]  = pix[i+2]  * .43;
  }
};
Example 3: Horizontal Mirroring
Filter.horizontalMirror = function(pix, width, height) {
  for(var i = 0; i < height; i++) {
    for(var j = 0; j < width; j++) {
      var off = (i * width + j) * 4;
      var dstOff = (i * width + (width - j - 1)) * 4;
      pix[dstOff]   = pix[off];
      pix[dstOff+1] = pix[off+1];
      pix[dstOff+2] = pix[off+2];
      pix[dstOff+3] = pix[off+3];
    }
  }
};
I Had No Idea How to Implement the Filter Effect
Up until this point, everything was easy. There were plenty of sample codes.
"Alright! Let’s keep going and build an Instagram-like filter!"
...
So, I can access the RGB values. I can get the Alpha values too. But wait—how do I actually apply the filter?
With Instagram’s Amaro or Toaster filters, or even Photoshop, you can just tweak the tone curve, and it works. But what’s actually happening behind the scenes?
...
Can’t I manipulate tone curves in JS?
That’s when I started digging deeper.
Attempting Instagram Filters with CSS
I found an article called Instagram filters recreated using CSS3 filter effects where someone tried replicating Instagram filters using CSS filter. It was pretty interesting and quite simple since it relied on CSS filters, but it had its limitations.
The issue? CSS filter makes it easy to apply grayscale or sepia effects, but it can’t do things like "make it bluer," "add more red," or "adjust each pixel individually." That’s why, on the Reddit discussion, people pointed out that the filters didn’t really look the same. While the effort was commendable, many agreed that CSS alone had its limits. (Personally, I thought it was impressive!)
Photoshop Makes It Look Easy
If you’re a web designer, you might think, "You can do this instantly in Photoshop" or "Just tweak the tone curve, and you’re done." That’s true—Photoshop lets you adjust tone curves, apply filters, and use layers, so there are plenty of tutorials on creating Instagram-style filters. Back when I did design work, I used to experiment with image editing in Photoshop too.
Among those tutorials, I found one titled How to make Instagram Filters in Photoshop, which recreated Instagram-like filters using only tone curves. Many other tutorials combined multiple effects, but this one came surprisingly close with just tone curve adjustments.
Of course, Instagram’s actual filter algorithms are proprietary, so we can’t know the exact implementation. But to create something similar, this method seemed like a solid approach.
So… Tweaking the Tone Curve Should Work, Right?
That led me to the next realization: "If I can modify the tone curve in JS, that should do the trick!"
But here’s the problem—I’m not a math expert, nor do I have a background in image processing. I had no clue how to approach this.
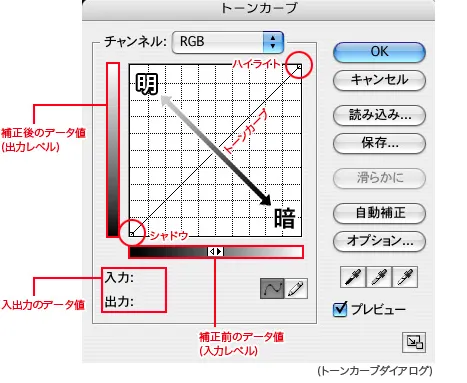
A tone curve allows you to control how each brightness level (from 0 to 255 for RGB) is adjusted—whether to make it brighter or darker. If you’ve done image editing in Photoshop, you’ve probably seen this: by placing a few control points, you can create a smooth curve.

You can adjust the tone curve separately for red, green, and blue channels. So, combining this with the How to make Instagram Filters in Photoshop approach, I started thinking:
"If I can place multiple points and generate a smooth curve from them, I should be able to transform the image just like a tone curve does."
That’s when I discovered that Lagrange interpolation was the solution.
(Finally, I could move on to the next step!)
Lagrange Interpolation Seems Like a Good Fit
Lagrange interpolation, simply put, is an interpolation method that determines a unique polynomial of degree at most ( n ) from ( n+1 ) given points. If we treat the tone curve panel as having "pre-adjustment data values" on the X-axis and "post-adjustment data values" on the Y-axis, then constructing the tone curve is equivalent to defining a polynomial function ( y = f(x) ).
As pointed out in research papers such as Interpolation Methods (Lagrange and Spline Interpolation), Lagrange interpolation has its limitations—when too many interpolation points are used, it can lead to excessive oscillation, making it impractical. However, given that I only had two days to implement this, I decided to go with Lagrange interpolation. Since the tone curves described in the How to make Instagram Filters in Photoshop tutorial only had about six or seven control points, I figured this approach would be acceptable.
Referring to examples like this Gist, I implemented Lagrange interpolation in my program to construct tone curves.
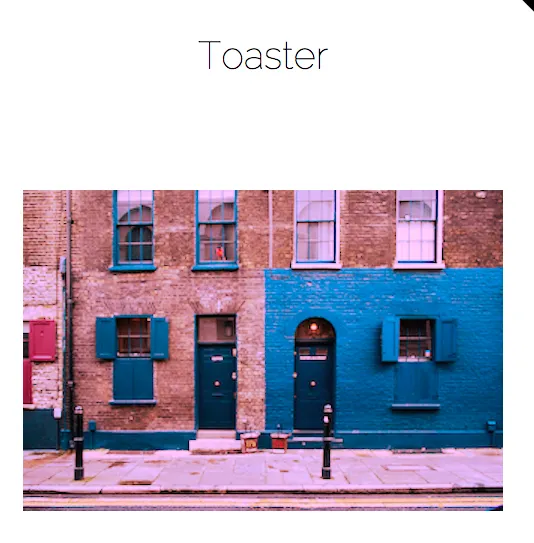
For instance, let’s take the "Toaster" filter, which gives images a slight reddish tint. The implementation looks like this:
Filter.toaster()
Filter.toaster = function(pix){

  var lag_r  = new Lagrange(0, 0, 1, 1);
  var lag_g  = new Lagrange(0, 0, 1, 1);
  var lag_b  = new Lagrange(0, 0, 1, 1);

  // Red channel adjustments
  var r = [
    [ 0,   0, 120 ], // [index, before, after]
    [ 1,  50, 160 ],
    [ 2, 105, 198 ],
    [ 3, 145, 215 ],
    [ 4, 190, 230 ],
    [ 5, 255, 255 ]
  ];
  // Green channel adjustments
  var g = [
    [ 0,   0,   0 ],
    [ 1,  22,  60 ],
    [ 2, 125, 180 ],
    [ 3, 255, 255 ]
  ];
  // Blue channel adjustments
  var b = [
    [ 0,   0,  50 ],
    [ 1,  40,  60 ],
    [ 2,  80, 102 ],
    [ 3, 122, 148 ],
    [ 4, 185, 185 ],
    [ 5, 255, 210 ]
  ];

  lag_r.addMultiPoints(r);
  lag_g.addMultiPoints(g);
  lag_b.addMultiPoints(b);

  for (var i = 0, n = pix.length; i < n; i += 4){
    pix[i]    = lag_r.valueOf(pix[i]);    // Apply transformation to red channel
    pix[i+1]  = lag_b.valueOf(pix[i+1]);  // Apply transformation to blue channel
    pix[i+2]  = lag_g.valueOf(pix[i+2]);  // Apply transformation to green channel
  }
};
The function addMultiPoints() in the above implementation allows interpolation points to be passed as a two-dimensional array. Here's how it works:
addMultiPoints()
Lagrange.prototype.addMultiPoints = function(arr){
  for(var i = 0, n = arr.length; i < n; i++){
    if(arr[i][0] !== 0 && arr[i][0] !== 1){
      this.addPoint(arr[i][1], arr[i][2]);
    }
  }
};
But Isn’t This Super Slow? → Solving It with the Web Worker API
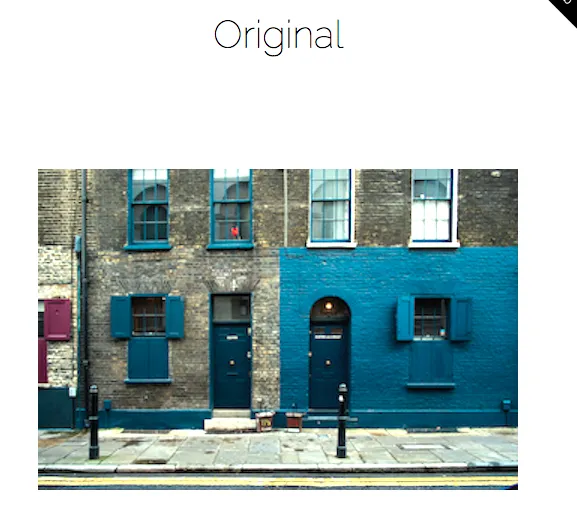
With this, I managed to get something that looks pretty close to what I wanted.
Before:

After:

However… this is an extremely heavy computation! So, as a final step, I used the Web Worker API to process the image in a multi-threaded manner. This way, the computationally expensive operations run in the background, minimizing the impact on the user experience.
Filter.process = function(img){

  ...

  // Extract pixel data
  pixels = Filter.canvas.getPixels(img);

  // Send the pixels to a worker thread
  worker = new Worker('js/worker.js');
  obj = {
    pixels: pixels,
    effects: effect
  };
  worker.postMessage(obj); // Here, we send the pixel data to a worker thread for parallel processing

  ...
};
Final Thoughts
That wraps up my journey of building an Instagram-like image filter in JavaScript. Since I’m still learning, there might be parts that aren’t best practices or even fundamental misunderstandings—so I’d love to hear your feedback!
At the same time, I hope this write-up provides some insight into the thought process behind building a library. Whether you’re new to programming or unfamiliar with concepts like Canvas or the Web Worker API, I hope this was a helpful reference.